Friday, October 9, 2009

It's Almost Halloween!


Are you looking for some tasty morsels to serve at your Halloween bash? If you are planning a buffet style for a large or even a smaller group, my I suggest one or both of the following dishes.

The first is my "famous" antipasti platter! I have talked about this one before here. Basically, I like to make a pretty platter with a variety of tasty items that all go together. I often vary what I put on the platter but I almost always place roasted red and yellow bell peppers, a mixture of tomatoes, basil, olive oil and garlic, salamis, prociutto, and olives. Other options are different meats, marinated mushrooms, artichokes, or different cheeses. Be creative. Use what is on hand and play with the color to make an attractive arrangement. I serve with fresh baguette slices or Italian ciabatta. This dish is really popular with my family and friends. I am asked to make it for many parties. The above platter was for a friend's 40th! It is a pretty large platter and I did one other one for that party at just the same size.

But the STAR of the platter is the Spicy Marinated Mozzarella with Oregano and Capers from Bon Appetit in the center! This is an amazing recipe and SO easy! I make it all the time.

Spicy Marinated Mozzarella with Oregano and Capers

Ingredients
  • 12 ounces fresh water-packed mozzarella cheese, drained, cut into 1/4-inch-thick slices
  • 6 tablespoons extra-virgin olive oil
  • 2 garlic cloves, minced
  • 1/4 teaspoon dried crushed red pepper
  • 1 tablespoon minced fresh oregano
  • 1/4 teaspoon coarse salt
  • 1/4 teaspoon ground black pepper
  • 2 tablespoons capers, chopped

Overlap cheese slices on medium platter.

Heat 2 tablespoons oil in small skillet over medium heat. Add garlic and crushed pepper and stir just until garlic begins to color, about 2 minutes. Remove from heat; stir in oregano, salt, and pepper. Cool. Stir in capers and remaining 4 tablespoons oil. Spoon over cheese slices.

This next dish (above) I want to introduce you to is from a 1995 issue of Martha Stewart Living. Once again, I have made this dish a couple times and each time it did not disappoint. In fact it was just SO good, I could barely stop eating it and rice, especially cold rice, is not even a big favorite of mine. It is just so fresh and tangy and light yet flavorful. The orange and lime juices just sing. The cilantro provides zing and the saffron the allure of far off places. The colors make it even that much more gorgeous both to the eye and the taste buds!

While this salad calls for squid/calamari, I chose to put shrimp in it instead. It was a bit easier and I felt that it would appeal to more people. The whole dish comes together in a snap and is so versatile. It can be a side dish, a main course, a picnic item or an appetizer.

Ingredients
  • 1/2 teaspoon saffron
  • 1 cup long-grain white rice
  • 3 teaspoons salt
  • 4 tablespoons fresh lime juice
  • 2 tablespoons fresh orange juice
  • 2 tablespoons extra-virgin olive oil
  • 1 small garlic clove, minced
  • 1/4 teaspoon freshly ground pepper
  • 1 teaspoon ground cumin
  • 1 pound cleaned squid, bodies cut into 1/4-inch rings
  • 1 1/2 cups quartered cherry tomatoes (12 ounces)
  • 3 celery stalks, peeled and chopped into 1/4-inch dice
  • 1/4 cup tightly packed cilantro leaves, roughly chopped
  1. Crumble saffron into 2 cups of cold water in a medium saucepan with a tight-fitting lid. Stir in rice and 1 teaspoon salt and bring to a boil. Reduce heat to low, cover, and simmer until rice is tender, 12 to 15 minutes. Remove from heat and let stand, covered, for 10 minutes. Fluff rice and transfer to a bowl to cool.
  2. Whisk together lime and orange juices, olive oil, garlic, 1 teaspoon salt, pepper, and cumin. Pour over cooled rice and mix to combine.
  3. Bring a saucepan of cold water to a boil. Add remaining teaspoon salt and squid. Cook until squid is completely opaque, about 30 seconds. Drain and plunge into a bowl of ice water. Drain again, pat dry, and add to rice. Toss with remaining ingredients and serve.

Don't forget, if you are looking for Halloween items or invitations, you can find many cute and festive things in my Zazzle Gallery! http://www.zazzle.com/missnnick* Please come on in and have a look. There are also many other designers in the forum with fun, witty and amazing art and gifts!
New Bag Styles

Sunday, August 16, 2009

Blog Cards, Profile Cards, Business Cards


Do you need a business card? Mommy card? Profile card? Blog Card? Come check out my Zazzle store and check out the selection! Or if you don't see what you had in mind, send me a note and I will work with you to design something for free and add it to the site. Then all you have to do is click and order! It is that simple. And I will continually be adding cards and designs to the store as well so keep checking back!

And again, I know I have been rather MIA but life is busy. As a quick update, I have been out playing with the kids this summer, working on a new line of photo cards, setting up more and more product on the Zazzle Store, have my computer crash sooooo bad that it took over a week to recover all the data and I still lost some. Mostly photos of all things. But my family photos were mostly backed up on Kodak. But the food photos... those I have been saving to share with you... the fish on the grill from Bon Appetit, the friendship bread, weekday dinners and who knows what... GONE! GONE, GONE, GONE forever! You know what that means???? #1) I REALLY don't have much to share at the moment. AND #2) I better get in the kitchen and start cooking up more dishes, photos and memories!

I want you to know that I miss you and blogging but some other things are just taking precedence. I hope you will excuse me. And I hope to be back soon.

Wednesday, June 17, 2009

Wedding Food Highlights

My cousin's wedding reception was at the Balboa Bay Club just over a week ago. Now I have a particular soft spot for this place as it is not only near my beloved water and Newport Beach but it is also where I had my reception! So my husband and I took a couple photos outside for memory's sake. How do you like my yacht? Don't I wish... But I did want to share my new shoes I am just loving!

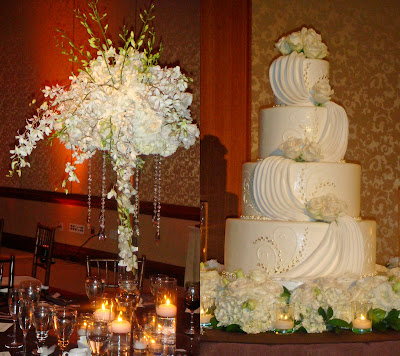
Now check out these flower arrangements and the CAKE! Have you ever seen anything so gorgeous? It was truly a spectacular wedding. One of the most beautiful I have ever seen!

Now onto some food highlights. Unfortunately I started to eat this before taking a shot of it.

Wild Mushroom Agnolotti with Pancetta and Asparagus
This was to DIE for! And for once I was rather happy my husband is such a picky eater. I got his too! Not that I needed that much but oohhhhh.... It was so amazing.

Tower of Red and Yellow Heirloom Tomatoes with Fresh Mozzarella and Arugula
I think this one speaks for itself. Absolutely delicious and beautiful to look at as well.

Now I am really bummed as I forgot to take a photo of the main course. I was just too busy eating, drinking, talking, laughing and having fun. But it was a duo of Pistachio Crusted Sea Bass with Beurre Blanc Chardonandnay Herb Grilled Filet Mignon with Port Sauce. Good? You could say that!

And check this out. BEFORE the cake was cut, this warm bread pudding à la mode was served.
Now bread pudding isn't my favorite dessert. It is fine but I usually don't waste the calories. But THIS! Oh me, oh my! I ate almost the whole thing! As as you see from above, I was already stuffed to the gills. It was warm mixed with cold. Doughy and cakey mixed with creamy and just so delicious.

What a fun night! We all had a blast and the food was just to die for. A big congratulations to Erica and Ronnie! You are a beautiful couple and I wish you all the best!

Tuesday, June 2, 2009

My Miss 'N Nick Zazzle Store

buy unique gifts at Zazzle

Hello Everybody!

How are you? I hope this email finds you well and enjoying the end of spring. Summer is nearly here! I cannot believe how time flies.

This quick post is to let you know about a new store/gallery I have opened. It is a print on demand site called Zazzle. There are a number of different products I have put the Miss 'N Nick style/my designs on from t-shirts to tennis shoes! Hats, buttons, mouse pads, onsies and even actual postage stamps can all be created and customized to my (or your) specifications. Please check out some of the designs I have created so far. http://www.zazzle.com/missnnick

Also, if you have a need for something in particular like shirts for your child's soccer team, hats for your company picnic, buttons for your new born baby or personalized gifts, I would be happy to work with you and illustrate something for FREE! I will then add it to the gallery and all you have to do is customize it with the text or sizes you need and order! Everything ships within 24 hours! It is that simple.

Once again please check out the site. http://www.zazzle.com/missnnick. Let me know if there is something you would like to see and tell your friends. Keep checking back too as I have a ton of ideas and designs I have yet to load into the gallery. This will be slowly happening as time permits. If you have a blog or website and want to help me promote it, I would be so happy to have you copy or share this flash piece or the web link on your site. Let me know.

Thanks for stopping by and taking a look!
Best,
Nicole
http://missnnick.com/

Saturday, May 16, 2009

The Best Blueberry Muffins

Whenever I go to the market with my children I try to get them to pick a new fruit or vegetable. This tactic seems to work just a teeny tiny bit better for getting them to try new things and have healthy options. So one day, not too long ago, my daughter started jumping up and down and begging for the blueberries. They looked good. The price still wasn't that low. But....

Me: Will you eat them?
Danielle: Yes!
Me: Promise?
Danielle: Yes! I love them!
Me: Are you sure?
Danielle: Mommmmmmyyyyyy... I want blueberries. They are sooooo yummy and I am going to eat all of them all up as soon as we get home.
Me: Okay then. You better eat them!

Flash forward an hour or so. Danielle eats one. She makes a face and pushes the basket away. I throw back a few. Nicholas wouldn't try them. And forget my husband. He is the worst!

You see last summer in Vermont, Danielle at a gazillion blueberries from a wild bush but the commercial variety do not seem to appeal to her too much. They are plump and pretty but do not have that same sweet and sour taste. So they sat in the refrigerator. And sat. And sat. And finally... there was only really one thing to do with them!

The problem was. I am not the biggest fan of muffins. They always taste just okay to me and after eating them I feel more bloated than if I ate a whole pizza! And YES, I have eaten a whole pizza once or twice in my life! The muffins just seem to sit in my stomach like a ton of bricks. But others like muffins so I could always bring some to my mom, grandmother, kid's teachers etc... Right?

WRONG! These turned out sooooo good that a couple made it to my mom's house and that was it! We gobbled them up for 2 days and then I froze just a couple for some special morning when I really wanted a sweet confection. Really these are probably THE best muffins I have ever had. You must give them a try.

Blueberry Muffins Recipe
(Adapted from Simply Recipes)

3 cups of all-purpose flour
1 Tbsp baking powder
1/2 teaspoon baking soda
1/2 teaspoon salt

1 1/4 stick of unsalted butter, softened
1 cup sugar
2 large eggs
1/2 cup heavy cream
1 cup Greek style yogurt
1 tsp. vanilla
1 teaspoon grated lemon peel

1 1/2 cups blueberries
1 Tbsp flour (if using defrosted frozen berries)

cinnamon sugar mixture

1 Adjust the oven rack to the middle-lower part of the oven. Preheat oven to 375°F.

2 Whisk together the flour, baking powder, baking soda, and salt and set aside.

3 In a large mixing bowl, cream butter and sugar together, beating until fluffy. Add eggs one at a time, beating until incorporated after each one. Beat in the grated lemon peel.

4 Beat in one half of the dry ingredients until just incorporated. Beat in one third of the yogurt. Beat in half of the remaining dry ingredients. Beat in a second third of the yogurt. Beat in the remaining dry ingredients and then the remaining yogurt. Again be careful to beat until just incorporated. Do not over beat. Fold in the berries. If you are using frozen berries, defrost them first, drain the excess liquid, and then coat them in a light dusting of flour.

5 Use a standard 12-muffin muffin pan. Coat each muffin cup lightly with oil using a pastry brush, or with a little butter. Or use one of those convenient vegetable oil sprays. Distribute the muffin dough equally among the cups. Sprinkle with a little cinnamon sugar mixture. Bake until muffins are golden brown, about 25 to 30 minutes. Test with a long toothpick to make sure the center of the muffins are done. Set on wire rack to cool for 5 minutes. Remove muffins from the tin and serve slightly warm.

Just perfect! And soooo moist. Delish!

P.S. If you think I am missing or MIA recently and possibly continue to forget to visit or post now and then it is just because with the warm, summer-like weather we have had here in So. Cal., I have been inspired to get off the computer and play with the kids, go for long walks, go to the pool (our community pool is now heated again), exercise, take the kids to Disneyland (with our passes), go to the pool, go out to eat, make margaritas, drink wine outdoors, go skating, go to the pool, make black bean soup, make cilantro pepita dressing, make cocktails, go to the pool, go to the beach, make more play dates, sign the kids up for camp, go to the pool, watch movies, have friends over for dinner, make food out of nothing, teach a friend from Romania how to make Mexican food, go to the pool, help plan a cousin's wedding, make birth announcements, go to the pool, go shopping, go to sushi, buy clothes, go to the pool, make mini tuna crab cakes in little mini tortilla bowls and take them to friends at the pool (I am so mad I didn't take a picture of this yesterday! They were GOOD, cute and I didn't even think I had anything for lunch before envisioning it), meet up with old friends you now talk to on FB, go to a museum, order pizza with friends, have more friends over, did I say go to the pool?

Needless to say my kids are progressing by leaps and bounds in their swimming skills. They are great. I am proud. We are fat, VERY tan and happy. So if you do miss me... I think you know where to find me! AT THE POOL! So come on down and join us! Bring some sunscreen.

Tuesday, April 21, 2009

Left-over Gruyère and Cider Fondue Sandwich

This post is in honor of Kathy's Grilled Cheese Pageant at her blog Panini Happy.

She gave plenty of time for all to enter. I had some great thoughts and ideas. Who doesn't love grilled cheese. And it is SO easy! But with my own "Open House", Easter etc... Time danced quickly away from me and the last minute was nearing. I didn't have everything I needed to make a Croque Monsieur like I wanted. I didn't have fresh mozzarella so my favorite tomato, basil, mozzarella was out. Plus that is fairly common. The good news? I had some left-over cheese fondue. Maybe I could do something with that. And I had some homemade bread. But when I woke up, there was NOT much of that even left! Paul had eaten some for breakfast.

So what you see above is ALL of the bread left in the house! The filling is left over fondue from Easter. I had made Bon Appetit's Gruyère and Cider Fondue from the March issue for an Easter appetizer. It was fantastic on Easter and I hated to throw away the left-overs, but each time I stared at the sad lump of cheese in my refrigerator, I was uninspired. The pageant was a good opportunity to use it. It was a more spreadable texture given the alcohol it was cooked with. And it did not look very appetizing at first. As it cooked though, the cheese gained back some of its sheen and melted around my panini press. Still it didn't look all that pretty. I paired it with bacon as originally I served it with sausage and thought it was a nice change yet complimentary. It was good. But something seemed missing. Maybe the bacon should have been inside?

I wish I had taken photos of the original fondue. It was great paired with bread (of course), small potatoes, green apples and kielbasa sausage. But we were so busy with the Easter egg hunt, scavenger hunt, jumping on the trampoline, eating candy, visiting with relatives, swimming, two big birthdays (my sister's 40th and my cousin's 30th, and eating more treats and goodies than anyone needs, that I totally got sidetracked and forgot!

Yes! My son opened all of his Easter eggs and candy onto the trampoline and began to eat and then jump, eat and then jump. Everyone was cracking up! He is SUCH a Dennis the Menace!

Click on the collage to see the images better if you like!

Tuesday, April 14, 2009

Welcome to Open House Night!

Welcome to the Open House Night! This is a sort of belated blogoversary celebration for me. It has been just over a year since beginning the blog. And what a fun ride it has been. I have learned so much from the new dishes I created and from all of you. Mostly, I am grateful for the new friends I have made and finding such a warm and generous community of fellow foodies!

A big thank you to those who participated in the party and brought something to share. I really appreciate the time and effort. Not to mention the delicious recipes! YUMMY!

As with any party, real or virtual, I would like to start by offering you a drink! Here is a Greek Skinos on the rocks with a slice of lemon.

This beverage is brought by my good friend Peter at Kalofagas. If you you aren't familiar with Peter and his cooking, you are missing out! I highly recommend heading over and sampling some great Greek cuisine. It is all to die for! Today Peter brought the Greek liquer, Skinos which is made from mastic gum. He grabbed a tumbler, threw in some ice and poured us a good shot which is garnished with a slice of lemon. Let's sip and savour this one slowly! It is a sweeter drink, perfect for after dinner. For more on the drink or Peter head here.

How about a cookie to go with your drink? Check out these adorable Butterfly Sugar Cookies.

These were brought over from Kathy at Cooking on the Side. Not only are they delicious looking and cute but I love that they fit in with my stationery style at Miss 'N Nick Designs! How fun is that! Kathy is one ambitious and talented young mother. Not only does she stay at home with her toddler but she manages to now have two fabulous food blogs with a ton of followers. Panini Happy is Kathy's first blog and is devoted to panini sandwiches. Cooking on the Side is her newest. It explores the recipes which are printed on packages we all have at home. How creative is that! Read the recipe and more about these darling butterfly cookies here!

Are you more in the mood for chocolate? Try some of these Walnut & Chocolate Mini Balls!

Coming all the way from Canela's Kitchen in Santiago, Chile, these little spheres of goodness should tame even the fiercest of sweet tooths. I know they are fantastic as Canela certainly knows her way around a kitchen especially in the baked goods department. Note: She is as sweet as her sweets too! Check out her blog for a healthy dose of yum and some beautiful music to listen to as you read. For the how to and ingredients for the Chocolate balls, click here.

Still not rich and chocolatey enough for you? Dive on into this Chocolate Covered Oreo Cookie Cake! Talk about sinful! With this around you KNOW it is a special occasion.

This amazing tower of goodness is brought over from Kristen at Dine & Dish. Kristen is a multi-talented, multi-tasking mom of three wows me with all she can accomplish. Imagine pulling off this cake with three young ones! Oh but wait, she is also in her third trimester and expecting a fourth soon! How she manages to maintain such an amazing site, writing and cooking while raising these kids is beyond me. It must be the organizational skills coupled with an amazing attitude. At present she is even organizing the third round of Adopt a Blogger! Check it out on her site. Click here for the recipe on this chocolate masterpiece.

Had your fill of sweets? Would you prefer to start with the savory? Step on over here and try some of this amazing White Bean Dip with Pita Chips.

This white bean hummus is a perfect appetizer for just about any occasion. Melissa at Alosha's Kitchen pitched this one in and I couldn't be happier with how well it complimented all the other dishes. Now if you haven't sat down over at Melissa's blog yet, you must. Melissa claims she only started cooking a few years ago but you wouldn't know it when you look at the dishes this witty writer pulls out from her oven! Wow! She looks like a pro to me. Go check it out and see what you think. For the recipe on the white bean dip made with cannellini beans pop over here.

I made a few made a couple dishes myself too. The first is a Spanish Tortilla (often called tortilla de patatas or tortilla española). I have really been wanting to make one of these for a while. It is basically just potatoes and eggs cooked in a pan until browned. Who wouldn't love that? I read about them in many blogs and magazines and for some reason had never tried it. Even when I was in Spain one time. I thought this party was the perfect occasion to give it a go.

I based my recipe on a very simple one I found at the Food Network site. But I combined ideas and techniques from a few other recipes I read as well.

Spanish Tortilla

Ingredients
  • 4-6 medium-small yukon gold potatoes, sliced thin
  • 1 medium onion, sliced thin
  • 1/2 teaspoon salt
  • 2 tablespoons olive oil, plus 2 tablespoons
  • 4 extra large eggs
  • a few splashes of half and half or milk (about 1/8 cup)

Slice the potatoes evenly and fairly thin. I used a mandolin set at 1/8". Slice the onion in the same fashion.

Heat 2 tablespoons of the oil in a large non-stick frying pan. Cook the potatoes and onions on medium to low heat until they begin to soften. Some may begin to color or turn golden. Continue cooking and turning until the potatoes are cooked through but not falling apart or breaking. Remove the potatoes from the pan and drain in a collindar.

Meanwhile break the eggs into a medium bowl. Add salt and pepper to taste. Whisk in milk. Add the potatoes and onions to the eggs mixture and toss until coated and evenly mixed.

Wipe out the frying pan and return to stove.

Heat the remaining 2 tablespoons of oil on a high heat and pour in the mixture, moving it around in the pan to make it lie evenly. Fry until golden brown on the bottom side. Turn down the heat and allow to cook for a couple minutes more to set the inside. The top may still be a bit runny. Continue to cook until the bottom is browned.

Slide the tortilla onto a large plate. Place the pan onto the plate and using oven mitts, flip the tortilla so the top side is now on the botttom. Return the pan to the stove and fry the other side until golden brown.

Slice into wedges and serve. DELISH!

Now I needed something to go with the Spanish tortilla. I opted for my famous (in my family) antipasto platter. The star of this platter is Spicy Marinated Mozzarella with Oregano and Capers from Bon Appetit. The first time I made it, I knew it was a keeper. And now it is one of my favorite go-to recipes for parties. EVERYONE loves it! I mean EVERYONE!

Spicy Marinated Mozzarella with Oregano and Capers

Ingredients
  • 12 ounces fresh water-packed mozzarella cheese, drained, cut into 1/4-inch-thick slices
  • 6 tablespoons extra-virgin olive oil
  • 2 garlic cloves, minced
  • 1/4 teaspoon dried crushed red pepper
  • 1 tablespoon minced fresh oregano
  • 1/4 teaspoon coarse salt
  • 1/4 teaspoon ground black pepper
  • 2 tablespoons capers, chopped

Overlap cheese slices on medium platter.

Heat 2 tablespoons oil in small skillet over medium heat. Add garlic and crushed pepper and stir just until garlic begins to color, about 2 minutes. Remove from heat; stir in oregano, salt, and pepper. Cool. Stir in capers and remaining 4 tablespoons oil. Spoon over cheese slices.

I like to make a pretty platter with a variety of tasty items that all go together. I often vary what I put on the platter but I almost always place roasted red and yellow bell peppers, a mixture of tomatoes, basil, olive oil and garlic, salamis, prociutto, and olives. Other options are different meats, marinated mushrooms, artichokes, or different cheeses. Be creative. Use what is on hand and play with the color to make an attractive arrangement.

Serve with fresh bread. In this instance I once again made Artisan Bread in Five Minutes a Day.

_________________________________________________________________
But wait! Don't forget! There is a giveaway too! The winner can be found at this post on the
Miss 'N Nick Design Blog! Or leave a comment here asking me and I will reply posthaste!

Friday, April 10, 2009

Don't Forget!!! The Virtual Open House Extravaganza + a Giveaway!


You are ALL invited! In honor of Art and Aioli's ONE year anniversary, I am hosting a VIRTUAL Open House night with food, wine, art and great company!

I would love for you to participate! Bring an appetizer, beverage, or dessert to share. Or send me some artwork to hang on the wall. I will need your food and art submissions by 6am April 13th.

Please send entries to missNnick [at] gmail [dot] com. Include "A and A Open House" in the subject line. Make sure your photos are at least 150 x 150 pixels (square). You will need to include your name, blog name and URL, the name of your entry (dish), the permalink to your entry, and a link back to Art and Aioli!
(Note: There are TWO "N"s in the email address)

Don't forget the giveaway too!
2 Individuals (drawn at random) will each

In order to be eligible for the drawing to win the invitations, you must pop on over to my Stationery Blog at Miss 'N Nick and leave a comment there. You can reach the proper post here: http://missnnick.com/blog/2009/03/spring-celebratory-giveaway.html

Tell a blog buddy!

Wednesday, April 8, 2009

Onion Soup - Comfort Food at its Best!

Spring has been a little funny this year. We have had a few warm days, some mild days and a few down right chilly days (for California that is). I also have read that a lot of you in different parts of the country or the world are facing a really cold spring, possibly some snow even. I really cannot imagine. But given the pending rain in the next day or two here, I thought I would offer up one of my very favorite comfort foods which is perfect for a chilly night. Although, unless temperatures are over 85°, I am happy with it any time.

French Onion Soup! Simple and so easy to make and it never fails to make me happy. You can look around at recipes and may have a favorite of your own. Frankly they all seem pretty similar to me. If you taste and add as you go, you should get it just right for your taste. Here is what I put in.

French Onion Soup (adapted from The Joy of Cooking)

Ingredients
2 Tbls unsalted butter
2 Tbls olive oil
5-6 onions sliced thinly
1-3 cloves of garlic diced
1-2 Tbls. fresh chopped thyme (tarragon also works really well)
1/4 cup dry sherry, cognac, or wine (I use sherry usually)
4 cups beef stock (or more to taste)
salt and pepper to taste

French Bread (stale or toasted works best)
Cheese (I prefer a good Swiss cheese such as Gruyère or Emmenthaler. But Mozzarella or provolone also work well. I also think it sometimes melts faster when grated but is prettier if you slice it before putting it under the broiler.)

Melt the butter with olive oil in large stock pot. Add onions, thyme or tarragon and garlic. Cook on medium to low heat until the onions begin to color and turn golden. This will take some time. Stir occasionally and allow at least 20 minutes or more. At this point you can put a lid on the pot and allow the onions to continue their slow cook until brown. Check it often and stir occasionally. Once again, this may take time. Up to another 30 minutes to an hour.

When the onions are the desired color add the alcohol and cook down for a minute or two. Add your stock and bring to a boil.. Reduce the heat and simmer uncovered for 20 minutes or more. Season with salt and pepper.

Spoon into individual bowls or cruets. Place a piece of toast or bread onto the soup, top with the cheese and place under the broiler until cheese is browned. Serve right away.

BE CAREFUL! I know you are aware that things from the oven are hot but something about these bowls with cheese under the broiler. REALLY hot and easy to burn yourself on. It is also very hot when you take that first bite. I don't know how many times, my tongue has been numbed with burns from onion soup!

To take comfort to an even more comfortable level (especially with little ones). On this particular evening I paired the soup with a simple burger. The kids love theirs with mustard. Normally I want my hamburger with the works but with such a substantial soup, good meat and....

Freshly made rolls created from the Artisan Bread in Five Minutes a Day recipe, simple was just right!

And to make the children (and big adult kids) happy, I worked up a batch of homemade fries as well. Remember when I said I was going to blanch a bunch of potatoes and freeze them in this post? Well let me tell you! I did it. I must have cut and blanched about 15 or more potatoes in my deep fryer. When they had cooled enough I put them in ziplock bags and placed them in the freezer. The result was a much quicker homemade fry on the night desired and it was SO crispy! It is my new method. If I have any potatoes and spare time, I will blanch and freeze for the future. The kids love them. I know fries aren't very healthy but it has to be better than fast food right?

________________________________________________________________
Don't forget to RSVP to my virtual Open House and stationery give away! The deadline has been extended until April 12th. Just email a good party recipe to missNnick [at] gmail [dot] com (missNnick@gmail.com) and include your name, blog address, permalink to the entry and a link back to me! Can't wait to see you there! (Note: There are TWO "N"s in the email address.)


Wednesday, April 1, 2009

Caramel Rolls- A breakfast treat, dessert or indulgent snack

WARNING! Proceed with caution and continue reading at your own risk. If you are an individual who has chosen to sacrifice something for lent such as sweets, sugary substances, pastries, junk food, dessert, over indulgences or carbohydrates-- discontinue reading now and come back April 12th or later. In the event that you do choose to continue reading, note that Art and Aioli and all associated with this blog are in no way responsible in any way, shape or form for you breaking any resolutions, diets or promises to yourself or anyone else. I am in no way to be held liable for what you may or may not do with this recipe and the final product.

Are you still reading? I owe this recipe to Kristen over at Dine and Dish. And at this point I don't know whether to thank her with the biggest hug ever or to be very angry as these things are so addicting and delicious, I could not stop eating them. And the thing is they are so easy to make. Aside from needing just a little patience for the rising time, it came together in minutes! It was so much easier than when I made these cinnamon rolls! Do you remember them? Oh yes. They were great! But a little time consuming. And you know what? These are ALMOST as good if not just as good and so very very simple. I couldn't believe it. I've got to hand it to Kristen for always finding simple and utterly scrumptious recipes. Go check out her site!

Mom’s Caramel Rolls (from Sidd on Recipezaar)

Like Kristen did, I halved this recipe since it was just for my family and it yielded PLENTY. 12 very decent sized rolls! Kristen used her bread maker for much of the beginning but I just used my hands. Sometimes it is soothing and really, it was just so simple.

Actually I halved MOST of the recipe. I did go ahead and make ALL of the topping and felt it was the right amount. We love that gooey, drippy, luscious stuff and if you are going to be this bad, you might as well go all the way! I also added nuts to the topping of one pan of rolls. I just love nuts with this kind of thing. But my kids prefer it without. Next time I think I will roll some nuts up inside the rolls when I sprinkle the cinnamon sugar onto the dough.

2½ hours | 2 hours prep

SERVES 18

Topping

  1. Mix water and yeast and wait 5 minutes.
  2. Stir in sugar, salt and 2 cups of flour.
  3. Add egg and butter and mix.
  4. Stir in rest of flour by hand, if dough is still sticky add just enough to make it not sticky anymore.
  5. Let raise until dough is double in size.
  6. Sprinkle flour on surface and roll dough out until is approx 18 X 12 inches.
  7. Spread a very thin layer of soft butter on dough and sprinkle cinnamon/sugar mixture on it.
  8. Roll dough from the long side, it should look like a log.
  9. Cut into 1 inch pieces.
  10. Should be 18 pieces.
  11. Place brown sugar and butter into microwave dish and heat until butter is just melted; stir well.
  12. Stir in 3 T water.
  13. Divide mixture into 3 pans (8-inch cake pans).
  14. Place 6 pieces in each pan.
  15. Let raise for about 45 minutes.
  16. Bake for 20 minutes in a 325°F oven.
  17. When you take out of oven, turn each pan of rolls over on a plate, otherwise you will have a hard time getting them out when they cool.
  18. If you can, let them cool slightly and enjoy them when they are still warm.
It is killing me to even write this post. I want one so bad. Perhaps I should make these for Easter Sunday! YUM! My extended family would love them.

Thanks Kristen!

Don't forget to RSVP to my virtual Open House! Just email a recipe to missNnick [at] gmail [dot] com and include your name, blog address, permalink to the entry and a link back to me! Can't wait to see you there! (Note: There are TWO "N"s in the email address.)

Monday, March 30, 2009

DEALS and STEALS! A guide to eating out for less in Orange County

You love food. And maybe you are a good cook but who doesn't love to eat out now and then? I know I do. But it is just a little harder for everyone, no matter what your situation may be. In the current economy we are all cutting back.

I have some great news though! You don't have to blow your budget every time you eat out. You can have your cake and EAT it too!

Get Happy at Happy Hour!
Many restaurants offer happy hour deals. If your job is flexible or you are able to get out early, you can still enjoy some very good food at prices that are up to half off the regular menu prices. Check your local favorite spots for happy hour times and prices.

And check THIS out! Here in Orange County Happy Hour Week is coming up! April 12th-18th, many fabulous OC eateries are offering special happy hour menus all day, all week! You HAVE to check it out! What a deal! Nearly a steal. If you aren't in Southern California, maybe you can Google around and find a site with restaurant deals in your neighborhood.

Kids Eat Free!
Now for the real STEAL! Yes, it is true. You can take the kids out for FREE! Many restaurants are trying to help out people with families. In Orange County and probably in your area as well, restaurant all over are choosing a day to offer free kids meals with the purchase of an adult meal. Here are some sites that feature the deals around this town:
http://www.lilaguide.com/forums/t/138.aspx
http://fastfood.freedomblogging.com/2008/07/22/kids-eat-free-in-the-oc/
http://www.ocfamily.com/t-EatUp_OC_restaurants_kids_eat_free0908.aspx

I hope you can find some great deals in your area as well.

Now for a quick bite from the Art and Aioli test kitchen.
Just add some special sauces to snazz it up!

We had my son's 3rd birthday over the weekend. Since it was at a park, I needed to think simple and easy to transport. My sister suggested Togo's. Well their sandwiches are okay but they don't thrill me too much. I decided to just make my own.

First up was purchasing good bread. That is a MUST. I made two kinds of sandwich. One was a fairly classic Italian Sub. I just mixed up my own sort of vinaigrette sauce. Don't forget to offer peppercinis!

The other sandwich I offered was a turkey sandwich with an avocado basil aioli. Let me tell you, the aioli came out GREAT!

Have fun with your sandwiches and play around with sauces and ingredients.


Avocado Basil Aioli

Ingredients
1/2 recipe of this homemade mayonnaise (I added 3 cloves of garlic)*
1 1/2 avocados cut up
large handful of basil

Put your mayonnaise in the food processor. Add the avocado and basil and blend to the desired consistency. Quick and easy. It is ready to go!

* If you don't want to make the homemade mayonnaise, use 1 to 1/2 cups of good quality commercial mayonnaise.

** Mix it up. Add cilantro instead of basil... or try some tarragon and roasted garlic... how about roasted red peppers and oregano... lemon zest and rosemary. I could go on and on. The possibilities are endless!


Don't forget to RSVP to my virtual Open House! Just email a recipe to missNnick [at] gmail [dot] com and include your name, blog address, permalink to the entry and a link back to me! Can't wait to see you there!

Tuesday, March 24, 2009

You're Invited!!! A Virtual Open House Extravaganza + a Giveaway!


You are ALL invited! In honor of Art and Aioli's ONE year anniversary, I am hosting a belated blogoversary bash! As a culinary art studio, it will be an Open House night with food, wine, art and great company I hope! Stop by any time on Tuesday April 14th to check it out.

But I would love for you to participate as well! Bring an appetizer, beverage, or dessert to share. Or send me some artwork to hang on the wall. It must be tasteful and suitable for audiences of all ages. I will need your food and art submissions by April 8th to make sure I have time to hang it and set it all out on the buffet table. I do want to make a nice presentation for the very first Art and Aioli Open House night.

Please send entries to missNnick [at] gmail [dot] com. Include "A and A Open House" in the subject line. Make sure your photos are at least 150 x 150 pixels (square). You will need to include your name, blog name and URL, the name of your entry (dish), the permalink to your entry, and a link back to Art and Aioli!

In addition to a wonderful party spread, I am going to do a new giveaway!


But here is the catch! While I would love for you to leave a comment on this post and gladly welcome any thoughts, in order to be eligible for the drawing to win the invitations, you must pop on over to my Stationery Blog at Miss 'N Nick and leave a comment there telling me why you prefer traditional invitations in the mail as opposed to Evites or emails etc... You must leave the comment by midnight on April 10th in order to be in the drawing. You can reach the proper post here: http://missnnick.com/blog/2009/03/spring-celebratory-giveaway.html

I am so excited. I just know we'll have a great turn out. Don't forget the deadline is April 8th for recipe entries and April 10th for contest entries. Tell a blog buddy!

*NOTE: The Cupcake invitations are NOT available for this offer. As one of our most popular designs, we are back ordered on this piece for about a month and I do not want to offer something that will not be available right away. Also note that if you need more than 2 boxes (20 invitations) , the two winners will also have the option of purchasing more of the same invitations or matching note cards at a 10% discount in conjunction with this giveaway extravaganza.

__________________________
________________________________________

Hungry right now? Try some of this!


Chinese Chicken in Lettuce Leaves
adapted from The Sterling Performance Cookbook

3 Tbls. oil (I use vegetable but add a small splash of chili and sesame oil as well for some heat)
1 1/3 cups finely chopped chicken breast
1 cup seeded and finely chopped red bell pepper
1/2 Tbls. sugar
1/2 Tbls. salt
Freshly ground pepper to taste
2 1/2 Tbls. minced fresh ginger
1 1/2 Tbls. soy sauce
3 Tbls. water
1 Tbls. fresh squeezed lemon juice
1 large scallion, sliced
1/2 cup chopped walnuts
cilantro for garnish

Heat the oil in a skillet or wok over medium high heat. Add the chicken, green or red pepper, sugar, salt and pepper. Cook, stirring constantly until the peppers turn a deeper color and the chicken is cooked, about 3 to 5 minutes. Add the ginger, soy sauce, water, and lemon juice to the chicken mixture, stirring well. Cook for 1 more minute. Remove the chicken from the heat. Sprinkle with the scallion and walnuts and garnish with cilantro. Set aside and keep warm.

Make spicy dipping sauce!

Spicy Dipping Sauce
1/4 cup rice wine vinegar
1/8 cup or more soy sauce
1 tsp. sesame oil
1/2 or more tsp. chili oil
1-2 tsp. hot chinese mustard
1-2 tsp. chili garlic sauce
A few scallions

Stir all the above ingredients together in a bowl until well blended.

To serve plase 2 or 3 tablespoons of the chicken mixture on a lettuce leaf, roll up; and place on serving dish. Pass the sauce separately.

Listen! If you are a fan of the lettuce wraps at P.F. Chang's, then you will like these. They are just as good. If not (dare I say???)... Better!

Tips: Cut the chicken pieces as small as you can. It is the hardest part of this dish. To make it easier to cut, freeze the chicken a little while or let frozen chicken thaw out partway.


Hey, did you know we are now on Facebook? Join the group. It's a lot of fun and a wonderful forum of ideas.

Monday, March 23, 2009

Putting Some Art in Today!


"You've Got a Friend" 2009 • By Sand Artist Ilana Yahav

You all know this blog is mostly food or the art of food. But just wanted to share an extremely beautiful video of sand art. It is amazing how this woman works and creates so quickly! Inspiring!

I received the video via email. The sand artist is Ilana Yahav. Check out her website: http://www.sandfantasy.com/

Thursday, March 19, 2009

Irish Meets American- My St. Paddy's Day Meal

Happy belated St. Patrick's Day to all of you. I hope it was a good one filled with corned beef, green beer or whatever floats your boat.

I don't usually do anything especially Irish on St. Patrick's Day. It's pathetic I know. Maybe because I only have a wee amount of Irish in me (hear my strong Irish Brogue?). In reality the the holiday is to honor St. Patrick, think about the start of spring and get a much welcome reprieve from Lenten resolutions. Now it is just an excuse to party! I remember one year, in my younger, single days, in which my friend and I got to an Irish pub a little before 5pm. After over an hour and a half of standing in line with no real signs of promise that we would EVER get in, we hightailed it out of there and had a glass of wine at some "non-Irish" and probably classier bar. That line thing was NOT up our alley. Nor is getting there and beginning to drink in the "wee" hours of the morning. Some people have to work! I'll go to an Irish pub another day of the year.

This year, however, I was in the mood to make the infamous corned beef! But my husband didn't think he would like it or eat it. Soooo picky! ;( So I came up with the idea of corned beef and pastrami sandwiches with cold slaw! At the last minute we invited a couple neighbors over too. I made green malts for the kids. The guys had beer and the women, wine. So you see... it wasn't quite corned beef and cabbage nor was it exactly hamburgers and fries. But very Irish-American wouldn't you say?

I didn't get a great picture of the cold slaw but I made it with my grandmother's ultra simple recipe with a little modification. She used just the cabbage, mayonnaise, a splash of white wine vinegar and a teeny teeny bit of sugar plus salt and pepper. We don't measure much in my family. My changes were, adding green onions, green bell pepper sliced very very thin and I used Julia Child's recipe for homemade mayonnaise. This was a GOOD cold slaw! I am picky about cold slaw but this was good!

I purchased the deli meat and amazing Gruyere cheese at this awesome German Deli near here. Mattern Deli has THE best sausage, meats, roast beef, pastrami and more. I love their sandwiches! And the bread... so different from that you find in most any other market. If you are in Orange, go check them out!

I thought the kids, as well as the adults might like a little pot of gold to go with their meal.
May the luck of the Irish be with you this year. We could all use a little pot of gold about now!

For a little more depth on the holiday and it's traditions, check out this video.


Wednesday, March 18, 2009

Double Double Protein Style!

Test
I don't know how many of you are familiar with In 'N Out. They really do have GREAT cheeseburgers!

How many of you know about the "secret" menu? Well in case you don't know, there are a number of ways to order your burger that are not posted on the menu boards at the restaurant. My favorite alternative to the regular cheeseburger is the "Double Double Protein Style"! This burger comes sans (without) a bun and is good for those minding their carbs more than their calories. And let me tell you... it is soooooo good! Almost just as satisfying as the regular double double! Go on... get a burger today!

Sunday, March 15, 2009

Cherry Berry Shortcake and My First Recipe Contest

It all started out with the contest. Do you know the one? Did any of you enter? The contest that Foodbuzz was running for Outstanding in the Field sponsored by Quaker True Delights. Well it called for recipe entries using on or more of the following ingredients:

Cashews • Chocolate • Raspberry • Almond • Bananas • Coconut • Macadamia nuts • Cherries • Cranberries

And the winner gets a trip to Chicago and an amazing outdoor dinner. So I thought... why not? Let's give it a shot! But the ingredients lent themselves more to a sweet concoction than that of a savory one. I can create and make up sauces, dips, appetizers and the like but a dessert? That is not as easy. What would be the point anyway? I never win anything. But the challenge was gnawing at me. I started to brainstorm. Cheesecake kept popping into my head. But could I pull it off? I kept toying with ideas. There were a few. Then it was coming down to the wire. The due date was Feb. 28th. Cheesecake has to be made a day ahead and I hadn't even gotten ingredients or decided the dish completely. Oh hurry up! Just choose, shop and get on with it!

And so I did! What I came up with is a Cherry Berry Shortcake as I call it. From their list, I used raspberries, sour cherries and macadamia nuts. I felt the shortcake idea was something loved by all and not as pretentious as cheesecake can be at times. It is homey and comfortable.

The base or cake I created was inspired by combing parts of my scone recipe with a traditional Scottish shortbread recipe and then I threw in some cream cheese in honor of my jam crescent cookies. I am calling this biscuit a Macadamia Shortbread Scone!

The cream topping was inspired by both clotted cream, whipped cream and cheesecake and has elements of all three in the ingredients and flavor.

As for the berry sauce, I used my grandmother's raspberry sauce for cheesecake as the jumping off point, added the cherries and made a few tweaks here and there.

It wasn't that easy. The hardest part was remembering to write the measurements and ingredients down as I went. Because at times I started small and added. So my paper had many scribbles and crossed out numbers etc.. The end result? Well it was pleasing to the eye and the taste? Soooo fabulously good! It was just amazing! The shortbread scones are right up my alley. My sister, cousins, mom and even my picky husband just couldn't get enough.

Here is my recipe. It is kind of long due to the 3 parts. But it is not really that time consuming.

CHERRY BERRY SHORTCAKE

Macadamia Nut Shortbread Scones


Ingredients
2 cups flour
1/2 cup powdered sugar (plus a tiny bit more if you wish for sweeter scones)
1/4 tsp. salt
1/4 tsp. baking soda
1 tsp. baking powder
About 1 cup chopped madadamia nuts
10 Tbls. butter (cold)
4 oz. cream cheese (cold)
1/2 cup sour cream (heavy cream that has soured or regular cream or milk will work)

In large bowl combine the flour, sugar, salt, baking soda and baking powder until mixed. Add the macadamia nuts.

Cut the butter and cream cheese into the dry ingredients until it resemble course meal. Add the cream (or milk) and stir until the ingredients hold together and form a dough. Using your hands shape the dough into a 2-3 inch thick log. Wrap in plastic and refrigerate for at least one hour.

Preheat oven to 350°. Spray a cookie sheet with non-stick spray. Pull the cold log of dough out of the refrigerator and roll into plain granulated sugar or cinnamon sugar mixture. Cut into 1 1/2 inch discs and place onto baking sheet. Bake for about 20 minutes or until lightly colored. Cool.

Sour Cherry, Raspberry Sauce

Ingredients
Zest of 1 lemon
Juice of 1 lemon
1/4 cup pomegranate jelly
1/4 cup raspberry preserves
1 Tbls. cornstarch
1-3 Tbls. sugar
1/2 cup frozen raspberries
3/4 cup frozen sour cherries

Mix the cornstarch, lemon juice and pomegranate jelly in small bowl until combined. Pour into sauce pan along with the raspberry preserves and heat on medium low until no longer cloudy and sauce begins to thicken. Add the frozen fruit and heat until warm and beginning to bubble. The frozen raspberries will begin to break apart. Add sugar to taste. Remove from heat and cool. Can be made a day ahead.

Whipped Lemon Cream

Ingredients
4 oz. cream cheese (softened)
1/3 cup creme fraiche
1/3 cup sour cream (commercial)
3 Tbls. granulated sugar
2-3 Tbls. lemon juice
3/4 cup heavy cream
1 tsp. vanilla
1/4-1/3 cup powdered sugar (to taste)

Combine cream cheese, creme fraiche, sour cream, lemon and granulated sugar until smooth and creamy.

Meanwhile put heavy cream in a large bowl and beat until beginning to thicken. Add vanilla and powdered sugar (to taste). Continue to whip the cream until soft peaks form.

Fold the cream cheese mixture into the whipped cream until just mixed.

Assemble the Dish

Place the macadamia shortbread scone on a plate. Pour a little berry sauce over it. Top with whipped lemon cream and a little more sauce.

Garnish with fresh berries, macadamia nuts or an extra scone piece. Serve immediately.

Now I wonder who won? Have you heard? I cannot find a post or announcement on the Foodbuzz site. I thought the results would be in today or sooner? We shall see. I am not holding my breath. But maybe you should until you try my dessert. It is worth the effort!